March 10th, 2026
Improved
We've significantly upgraded the Highlight Contact Path feature with expanded visual indicators, providing deeper insight into contact execution behavior directly within the workflow builder.
New Capabilities
Error Visibility — Nodes where errors occurred are now highlighted directly in the builder, enabling faster identification of failure points.
Skipped Node Indicators — View which nodes a contact bypassed during execution
Entry & Exit Status — Visual indicators display when a contact entered and exited the workflow, providing clear execution boundaries.
In-Progress Tracking — Identify contacts still actively moving through a workflow at a glance.

Why It Matters
These enhancements provide complete visibility into contact journeys including errors, skipped steps, and real-time progress, eliminating guesswork when debugging automations or analyzing contact behavior.
How to Use
Open Enrollment History or Execution History
Click the Highlight Contact Path icon
View the enhanced path with error nodes, skipped steps, and status indicators
March 10th, 2026
Improved
A.I.
We’ve introduced Response Style Settings
in Conversation AI, giving you control over how long and detailed your bot’s replies should be.
You can now choose between Concise, Balanced, or Detailed responses based on your business needs.
What’s New?
You can now:
Enable or disable Response Style Settings
Choose between:
Concise – Short, crisp replies (~30 words)
Balanced – Moderate detail (~ about 80 words)
Detailed – More comprehensive replies (~ up to 200 words)
Apply this setting at the bot level
Automatically influence how AI generates responses in Auto-Pilot mode
If this feature is turned OFF, the bot will continue responding exactly as it does today, no changes to current behavior.
How It Works
Go to Conversation AI → Bot Settings
Scroll to Response Settings
Toggle on Response Style Settings
Select: one of Concise, Balanced, Detailed
Click Save
Important Notes
Response Style acts as a guiding instruction (soft limit), not a strict word cap. Depending on the conversation and the amount of information involved, the bot will attempt to structure its response within the selected style.
Avoid adding conflicting length instructions inside your custom prompt (e.g., “always respond in 20 words”) when using this feature.
If multiple length instructions are present, prompt-level instructions may override or conflict with the selected style.
Why This Matters
Better control over tone and depth
More natural conversations based on context
Improved engagement depending on use case
Greater flexibility without changing prompts
March 10th, 2026
What's New
The Merge Contact action is a dedicated workflow action that automatically identifies and merges duplicate contacts directly within your workflows -eliminating the need for manual cleanup from the contacts page.


Match By Options -Choose how duplicates are identified:
Email: Matches contacts sharing the same email address
Phone Number: Matches contacts sharing the same phone number
Email and Phone Number: Matches only when both email and phone number are identical
Smart Merge Logic- The system always preserves the older contact record and merges the newer duplicate into it, ensuring no historical data is lost.
Full Execution Visibility-Every merge is logged in Execution Logs with detailed metadata, including which contacts were matched, which record was preserved, and the matching criteria used.
How to Use
Add the Merge Contact action to your workflow.
Select your preferred Match By criteria (Email, Phone Number, or both).
The action handles detection and merging automatically when the workflow runs.
Why This Matters
Duplicate contacts create noise in your CRM and can lead to redundant communications or inaccurate reporting. Previously, merging duplicates required manually navigating to the contacts page to find and resolve them one by one. With the Merge Contact action, deduplication is now fully automated within your workflows - keeping your contact list clean, unified, and accurate without any manual effort.
March 9th, 2026
Improved
🧭 Overview
We’ve redesigned the Calendar Settings experience to make configuration clearer, more structured, and easier to navigate.
This update introduces a cleaner information architecture with logically grouped sections, contextual helper text, and a wider layout for improved readability.
The goal: help you configure calendars faster — with less scrolling and less confusion.
🚀 What’s New
✅ Clear & Structured Settings Layout
Calendar settings are now organized into clearly defined sections:
Basic details
Staff & location
Availability
Booking rules
Advanced settings
Within Advanced Settings, you’ll find:
Form & confirmation
Payments
Notifications & policies
Widget appearance
External sync (Event Calendars)
Booking channels (Other Calendar Types)
Each section now contains only related settings, making navigation more intuitive.
✅ Contextual Helper Text
Each section includes concise helper texts explaining each associated setting's purpose, improving discoverability and reducing configuration confusion — especially for new users.
✅ Wider Layout for Better Readability
The Calendar Settings panel now spans a larger portion of the screen.
This improvement:
Reduces unnecessary vertical stacking
Improves spacing between fields
The layout remains fully responsive across standard screen sizes.
🧩 How to Access
Navigate to:
Calendars → Calendar Settings → Meetings → Edit Calendar
You’ll now see the updated structure and improved layout.
🎯 Why This Matters
More intuitive and faster calendar setup
Better readability with improved use of screen space
A stronger, scalable foundation for future calendar enhancements
Minimizes excessive scrolling and shows more settings upfront, improving the discoverability


March 9th, 2026
New
What’s new?
You can now connect Canva directly inside Media Storage and:
Browse Canva designs
Edit in Canva
Download files
Import designs into My Media
No tab switching. No manual downloads. No version confusion.
This works similarly to Google Drive integration, with access limitations due to Canva Marketplace rules.
How it works
Canva is connected at the location (sub-account) level.
Only one Canva account per location
All users in the location can view assets
Proxy (“Login As”) users cannot access
How to use it
Connect Canva
Media Storage → Canva Tab → Connect
App Marketplace → Install Canva
Complete OAuth → Designs appear in Media Storage
Edit from Canva Tab
3-dot menu → Edit in Canva → Import updated version
Edit from My Media (PNG/JPG/JPEG only)
Click Edit in Canva → Re-import updated version
Why we built it
Marketers constantly switch between Canva and Media Storage to design and upload assets.
This integration:
Reduces friction
Prevents duplicate uploads
Centralizes asset management
Speeds up creative workflows
Additional Notes
Permissions
Installer: Full edit access
Other users: View, search, download, import
Only one OAuth connection allowed per installation
If a non-installer tries to edit:
“You have view-only access to this media. To make changes, import it into your own storage or reach out to your admin for access.”
Smart Design Tracking
Prevents duplicate Canva copies when editing from My Media
Disconnecting
Uninstall via App Marketplace
Previously imported files remain
Good to Know
One Canva account per location
Must import before using in funnels/emails
Private Canva files cannot be edited


March 9th, 2026
New
🧭 Overview
We’re excited to introduce
Rentals within Calendars!🎉
Rentals is a powerful new addition to OS’s scheduling suite, purpose-built for businesses that manage bookable inventory like equipment, vehicles, spaces, vacation properties, event setups, and more.
Unlike traditional appointment scheduling, Rentals is designed for duration-based, inventory-driven bookings — giving you full control over availability, pricing logic, booking types, and multi-item checkouts.
Whether you rent by the hour, day, week, or month, Rentals gives you the flexibility to model your real-world business accurately.
🚀 What’s New?
✅ Customizable Listings with Variants & Inventory
Create listings for each rental offering and configure:
Pricing per hour/day/week/month
Quantity tracking
Variants (e.g., size, type, configuration)
Lead time, buffer time, booking window rules


✅ Inventory Tracking & Availability Control
Control how many units of each listing are available at any given time.
The system automatically:
Checks availability across selected dates
Prevents overbooking
Blocks unavailable inventory
✅ Flexible Pricing Models
Support for:
Tiered pricing by duration or quantity
Seasonal pricing
Day based pricing
Security deposits
✅ Flexible Booking Types
Choose how customers book based on your business model:
Date & Time Selector
– Ideal for hourly and short-term rentals
Date Selector Only
– Perfect for day-based or night-based rentals
Fixed Duration Bookings
– Offer predefined packages (e.g., 3-day bundle, 5-day bundle)
Each listing can define its own booking behavior.
✅ Multi-Item Bookings
Customers can book multiple rental listings in a single checkout — perfect for bundles, event setups, or combined equipment rentals.
✅ Customer Booking Page
Offer a dedicated customizable public-facing booking page that:
Displays listings and categories
Shows real-time availability
Offers a smooth booking experience
This gives rental businesses a streamlined and professional booking experience.


✅ Flexible Booking Management (Admin Experience)
Rentals includes a full booking management system:
Create bookings manually from in-app
Add multiple listings within one booking
Modify dates, duration, quantity, or pricing
Automatically generate invoices for every booking
Collect payments in-app
Track booking statuses (Booked → Active → Completed)
View and manage all bookings from Appointment List View or Calendar View
✅ Revamped Calendar View
A dedicated Rentals calendar view allows you to:
See bookings across all listings in a unified grid
View bookings color-coded by status (Unconfirmed, Booked, Active, Completed, Cancelled)
Filter by listing, status, payment status, categories
Open detailed booking information directly from the calendar
Manage all rental operations from one centralized view.

November 2nd, 2024
New

What's New?
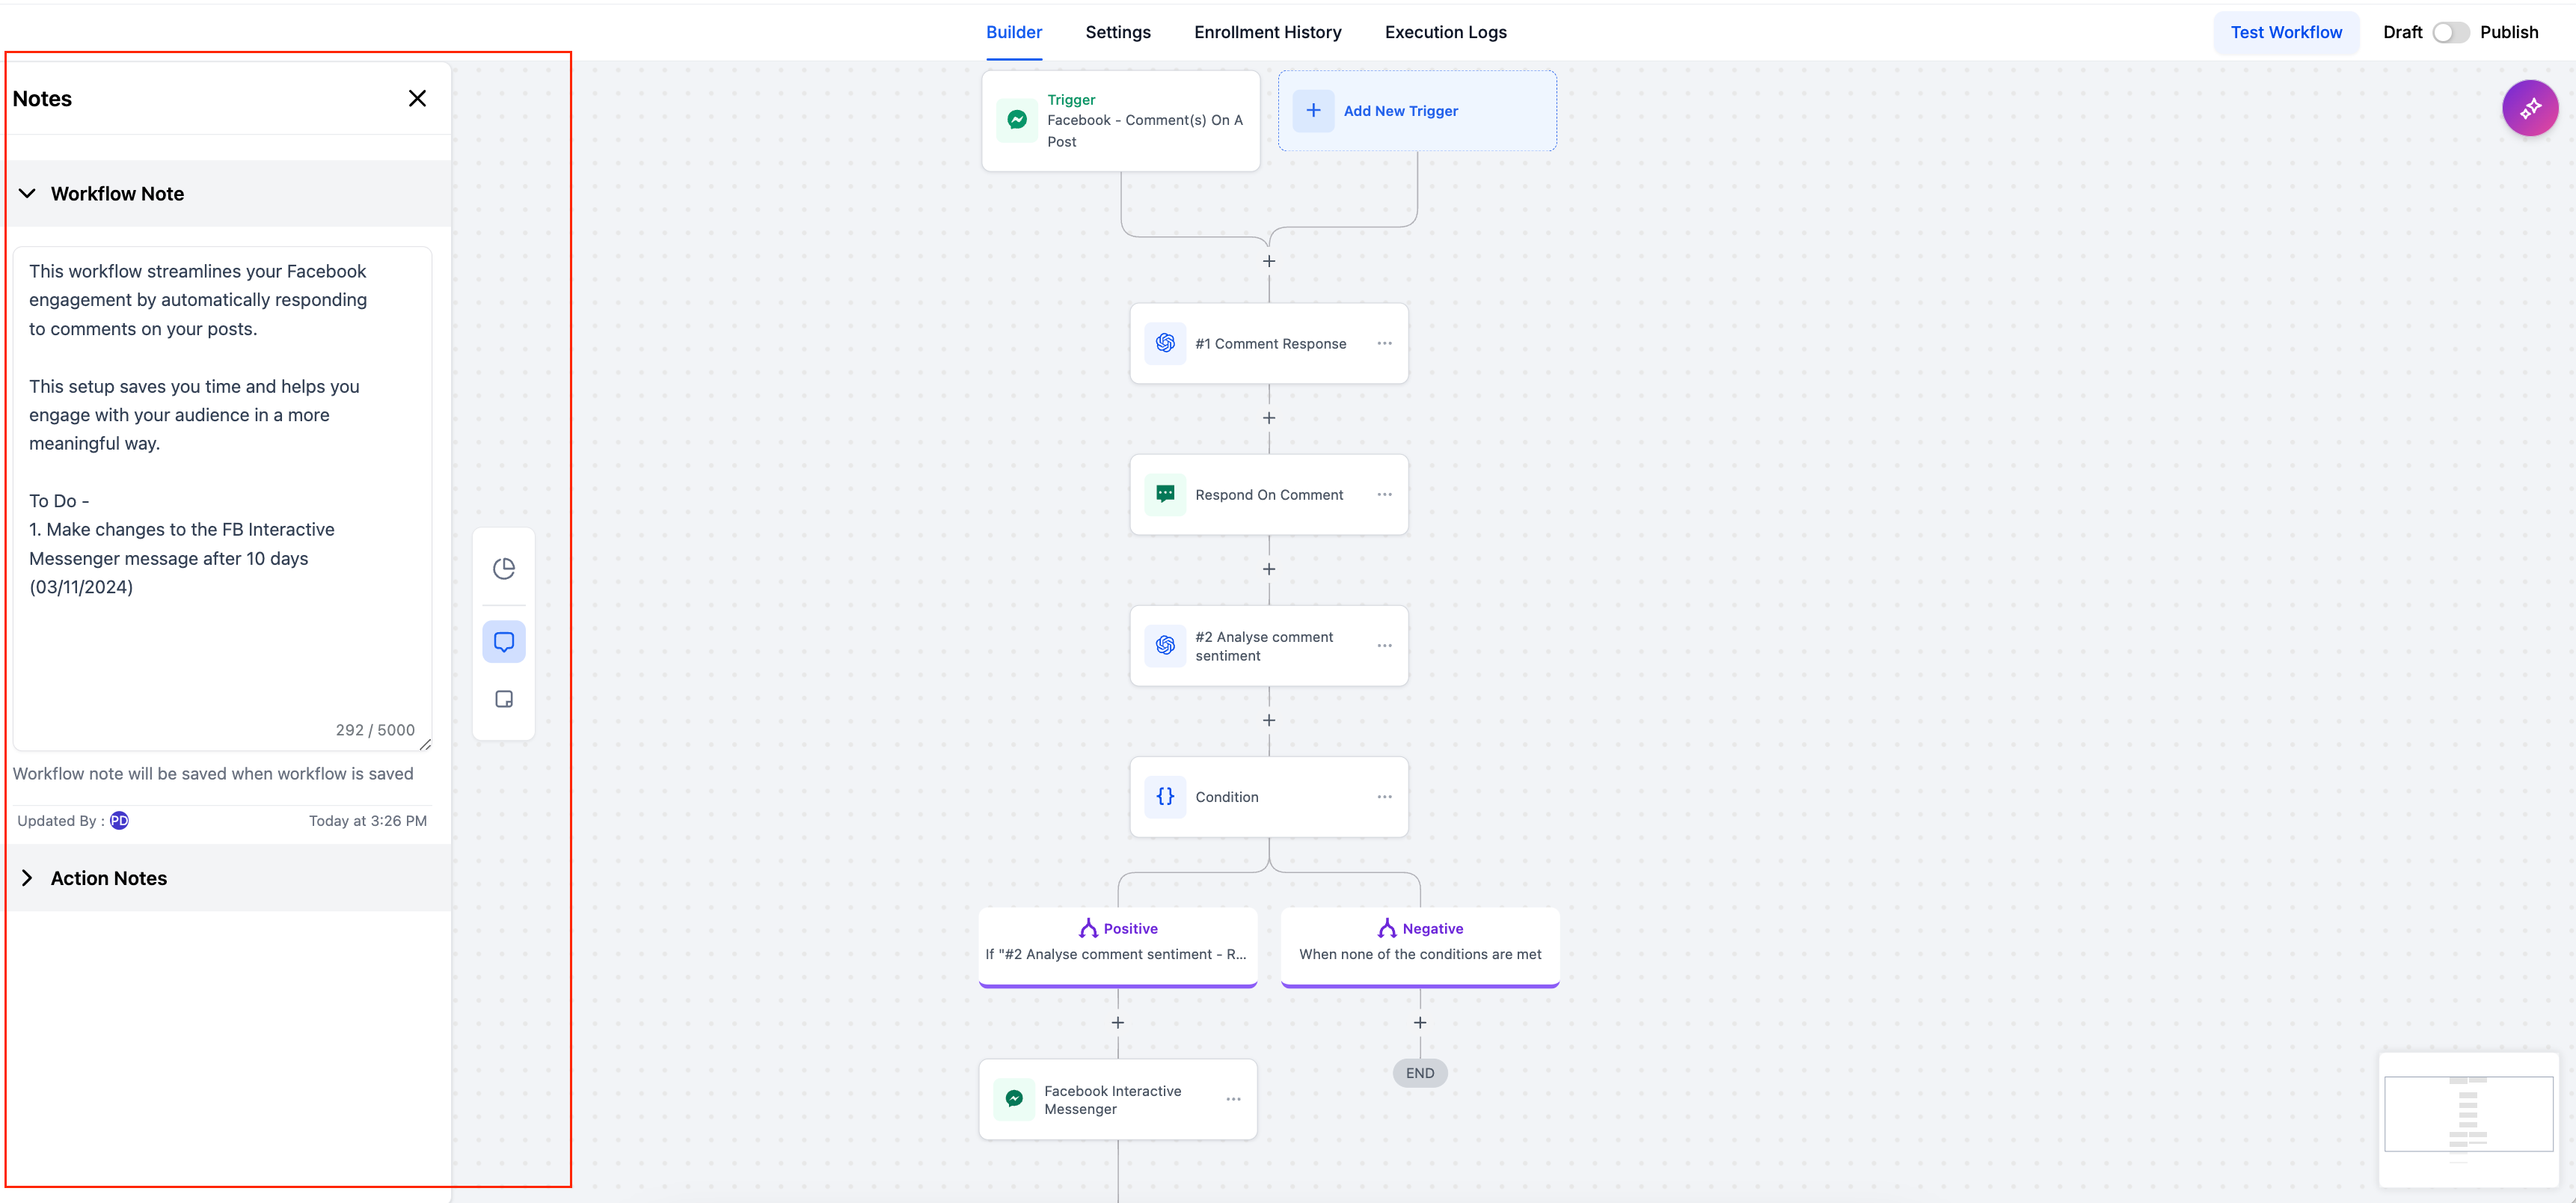
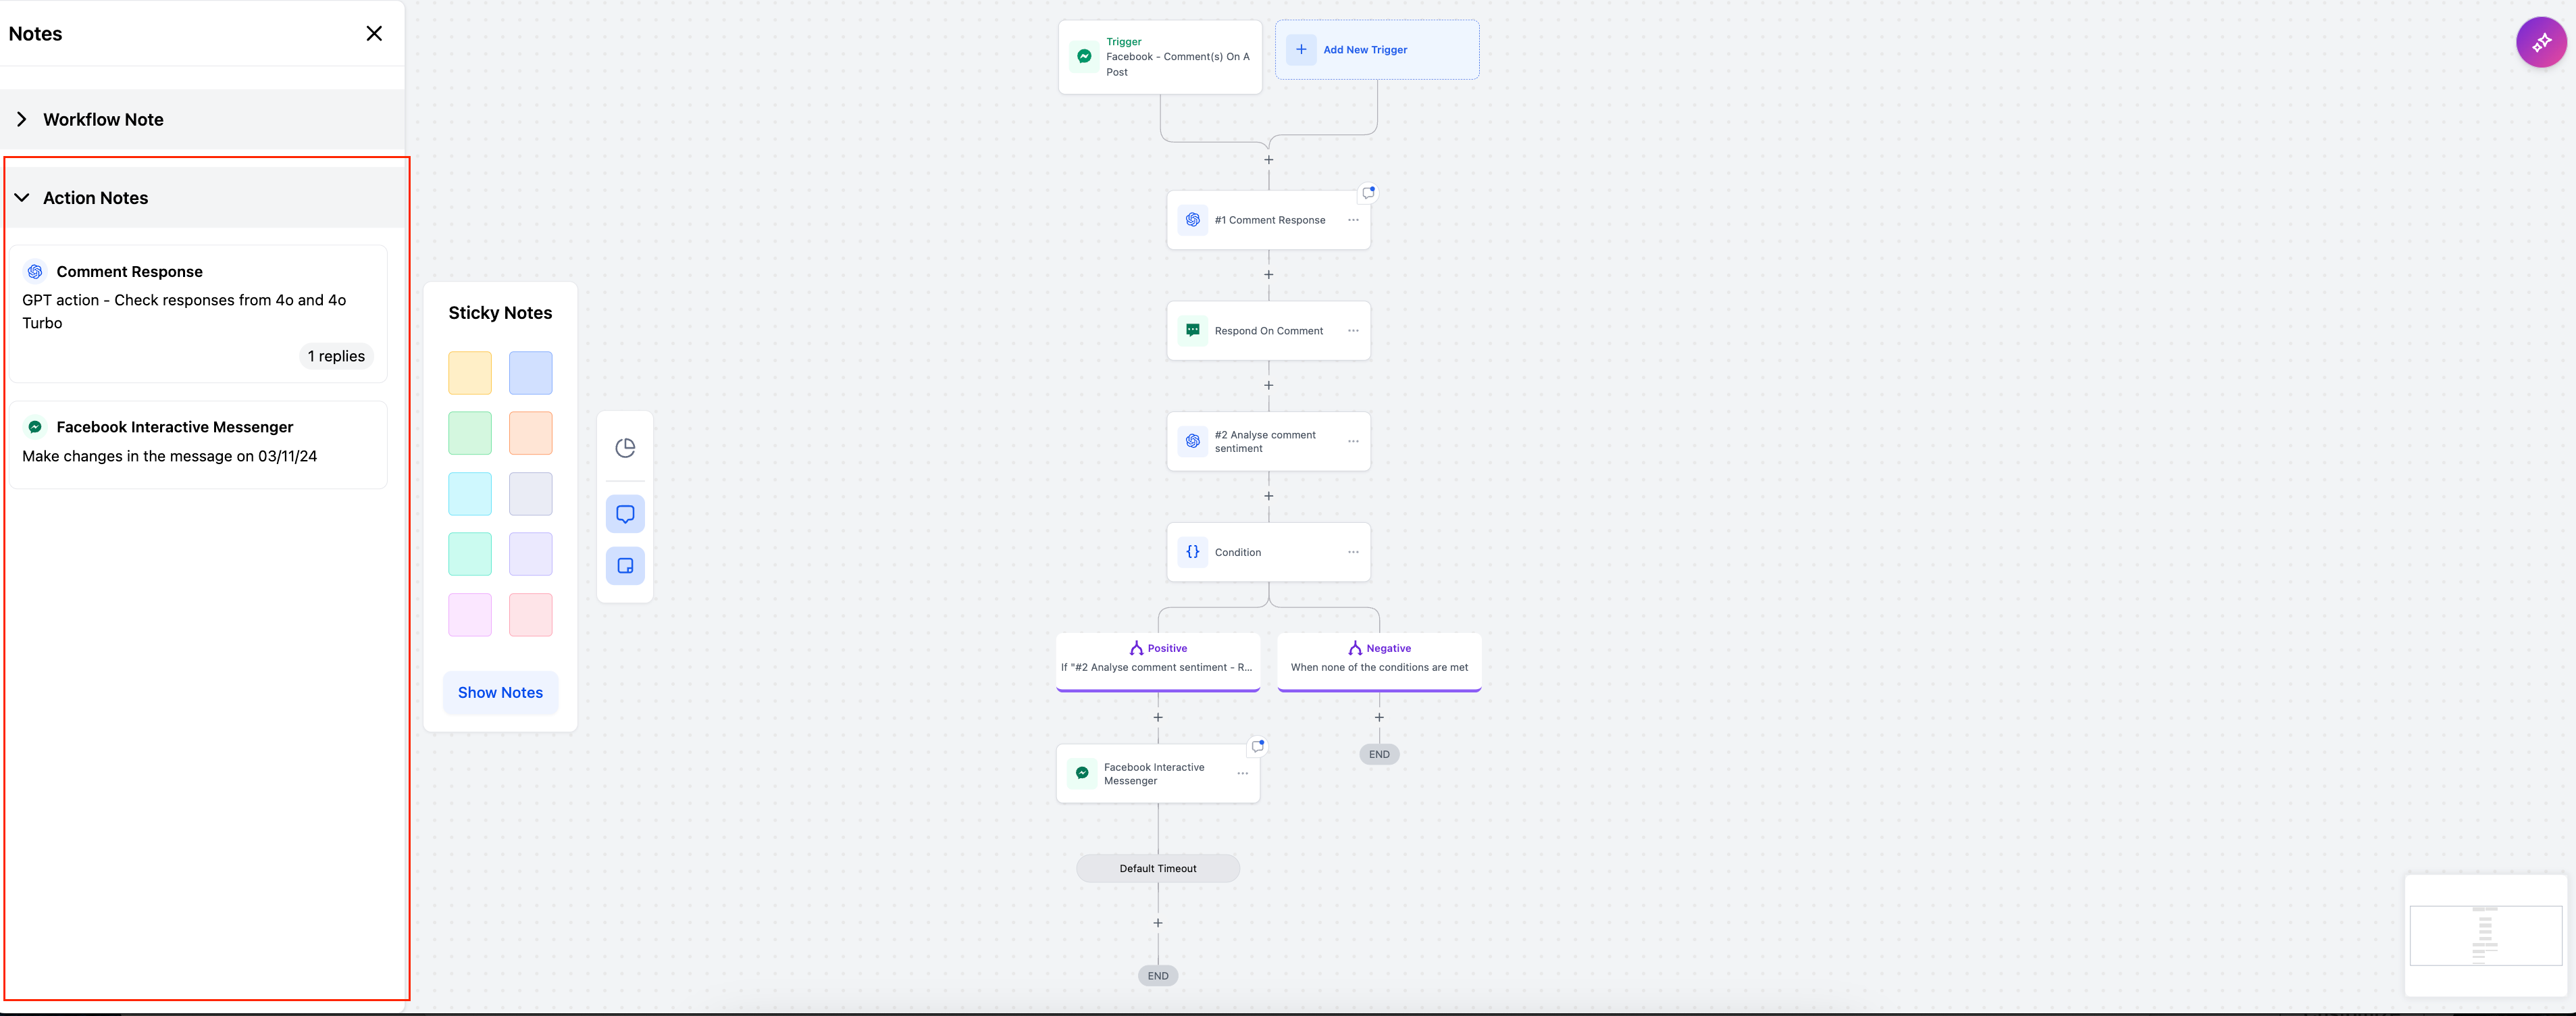
We’re thrilled to introduce one of the highly anticipated feature for workflows: Notes. With this update, users can add and track important information for each workflow.
All New Sidebar
Workflow Level Notes
Sticky Notes
Action Level Notes
How it Works?
All New Sidebar
Easier Navigation: The Stats View is now located in the sidebar alongside the new Notes and Sticky Notes options.
Toggle Capability: By clicking the Stats View icon, you can activate or deactivate this view. When active, the icon will highlight, indicating the feature is enabled.
Workflow Level Notes
Who can add Notes: Admins can now add Notes for a specific workflow.
How to use: On clicking the "Notes" icon user can add the Notes. The notes will be visible to all the users.
Saving the Notes: The Notes will get saved when the Workflow is Saved.
Tracking: Workflow notes include Created by / Edited by and Created on / Edited on information, so users can track who made changes and when they were made.
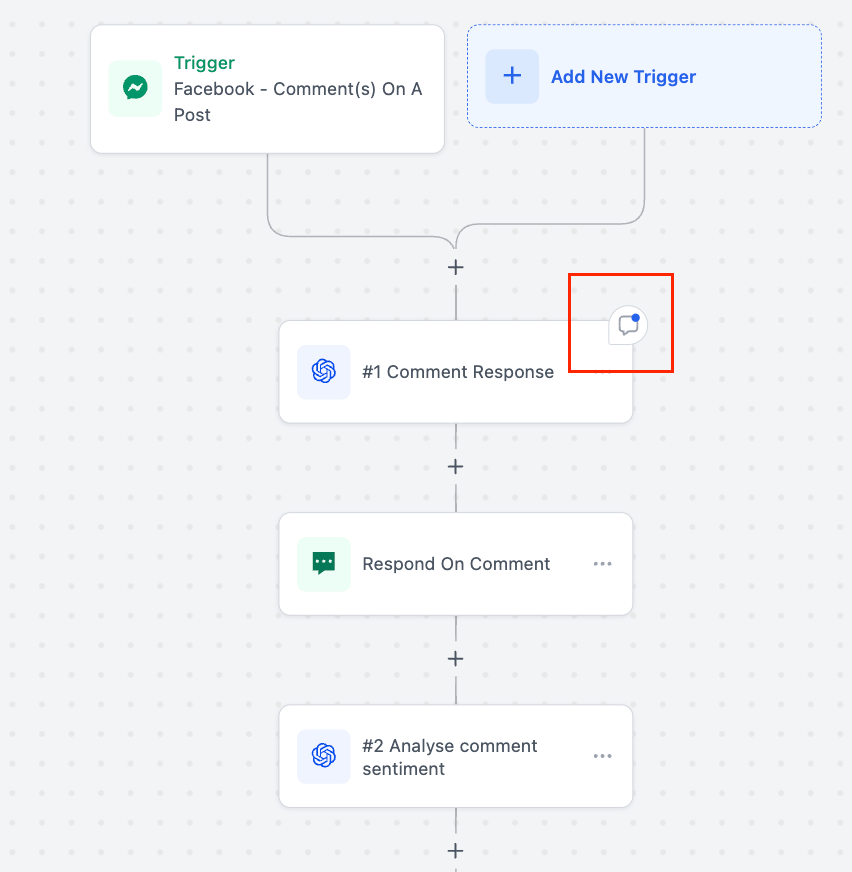
Action Level Notes (Formerly known as Comments)
How It Works: When a user hovers over an action, they’ll see the notes icon in the top-right corner. By clicking it, they can add action-specific notes that others can view and build upon.
Visibility: The icon will appear permanently if the note is added to an action.
History: Each note maintains a history of additions, making it easy for teams to track discussions, updates, and feedback on specific actions within a workflow.
Centralized Notes View: All Action-Level Notes are also available in the primary Notes section, allowing users to see and search through all notes in one place.
Use Cases
Use Workflow-Level Notes for high-level descriptions, objectives, and context, ensuring everyone understands the purpose of each workflow.
Utilize Sticky Notes to create color-coded task lists and visual reminders for team members, making it easier to track workflow progress.
Sticky Notes can guide sub-account users step-by-step through each action and trigger, making it ideal for training and onboarding new users.
Attach Action-Level Notes for instructions, feedback, or background context related to each specific action, ensuring clarity and enhancing team collaboration.
November 2nd, 2024
New
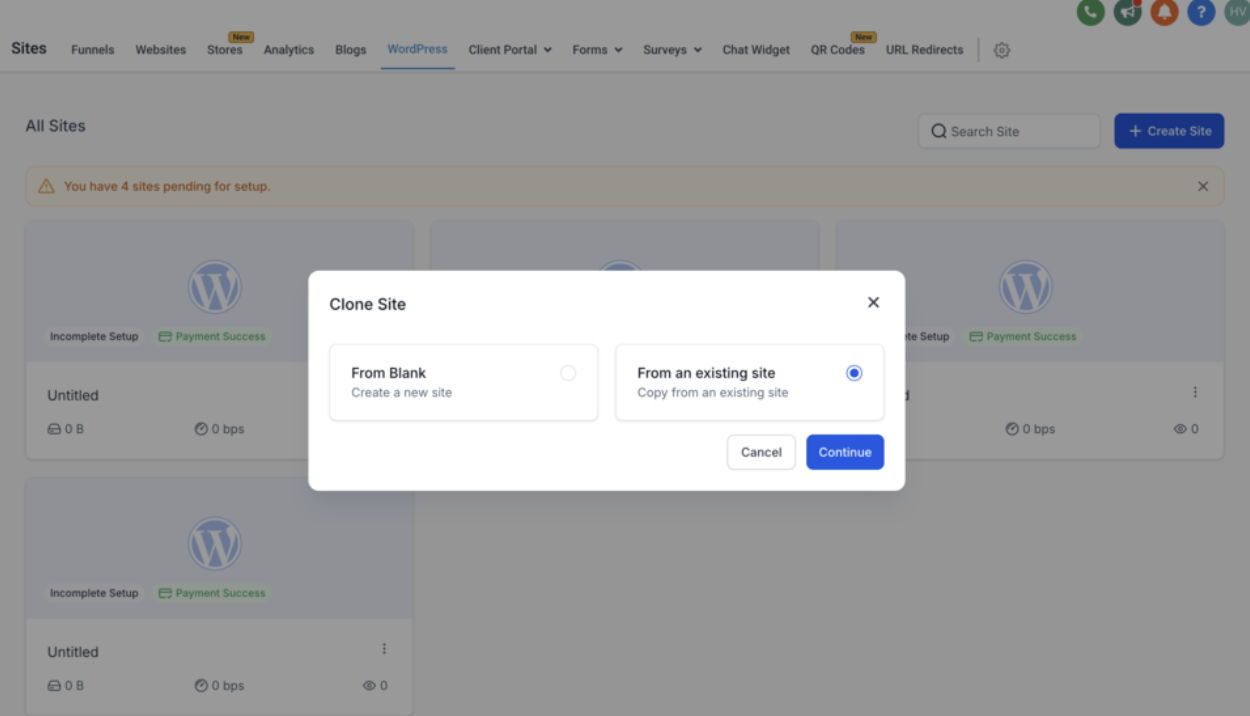
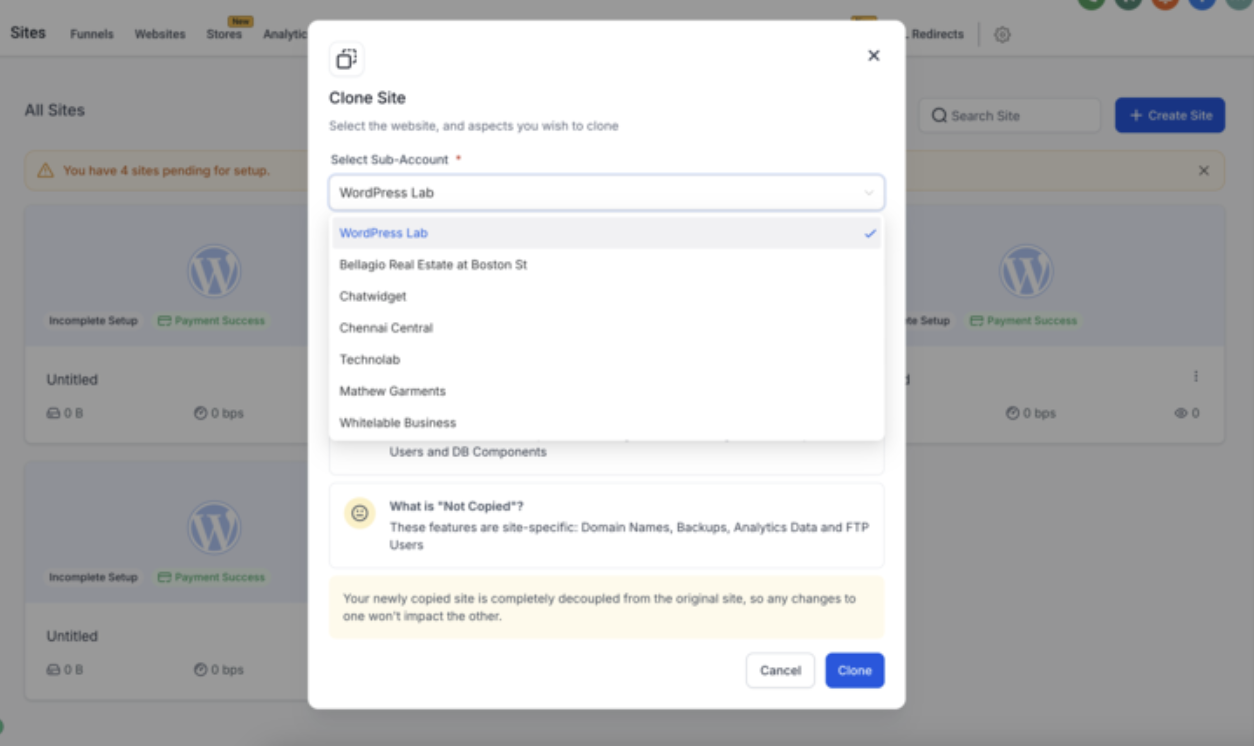
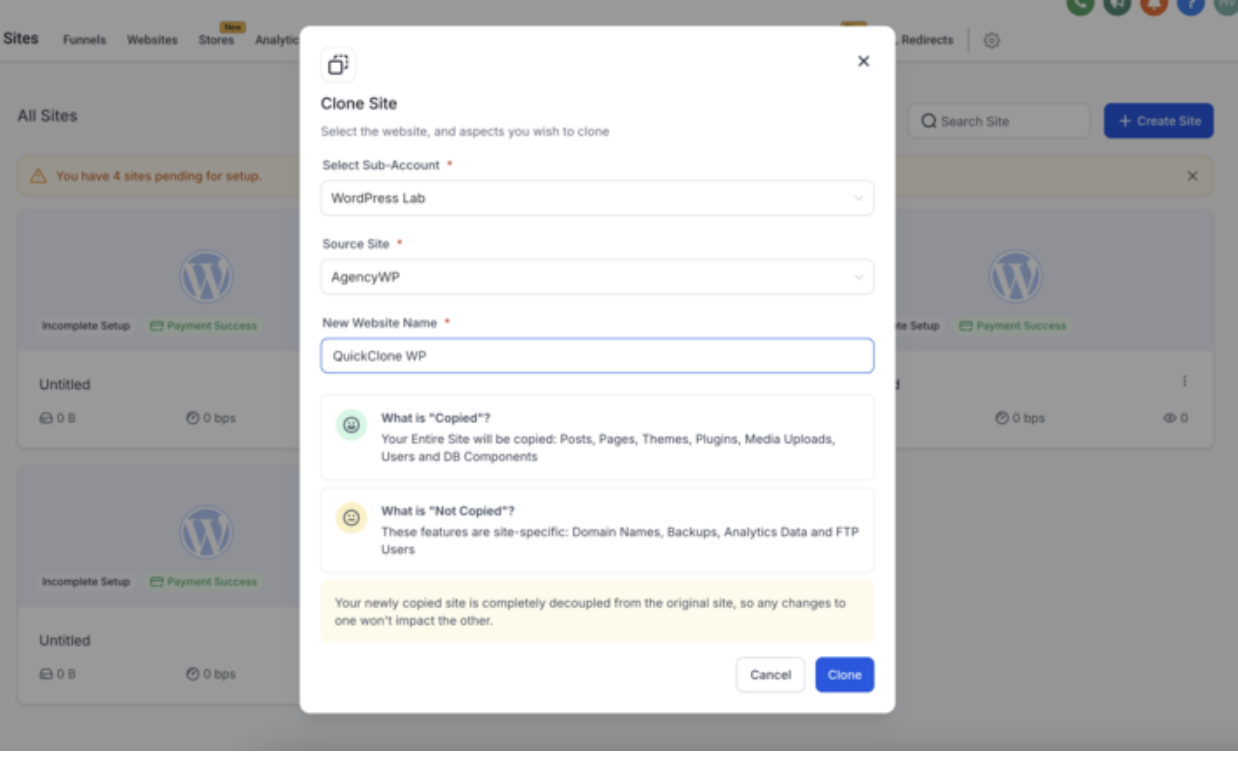
We’re excited to introduce the Site Cloning functionality, offering a swift and reliable way to duplicate WordPress sites with just one step. 👨🏻💻
What’s New?
• Users can now easily replicate existing WordPress sites, retaining all content, themes, plugins, and configurations.
• Role-Based Access Control: The cloning feature is secured by user roles, ensuring only authorized individuals can clone sites.
• Progress Indicators: Users can track the cloning process in real-time with built-in progress indicators to ensure transparency and smooth operations.
👷 How It Works:
1. Navigate to WordPress Dashboard → Create New or Select Blank WordPress.
2. Click the Incomplete Setup Card → Choose From Existing Site.
3. Select the Sub-Account → Choose Source Site → Enter New Website Name → Click Clone.
• Your cloned site will be fully independent from the original, and any modifications will not impact the source site.
This feature brings efficiency and ease to site management, enabling users to replicate sites quickly while maintaining flexibility and control! ✨
Have some suggestions for WordPress Hosting? Simply post your ideas on our 💡 Ideas Board, and we will prioritize your suggestions!
November 2nd, 2024
New
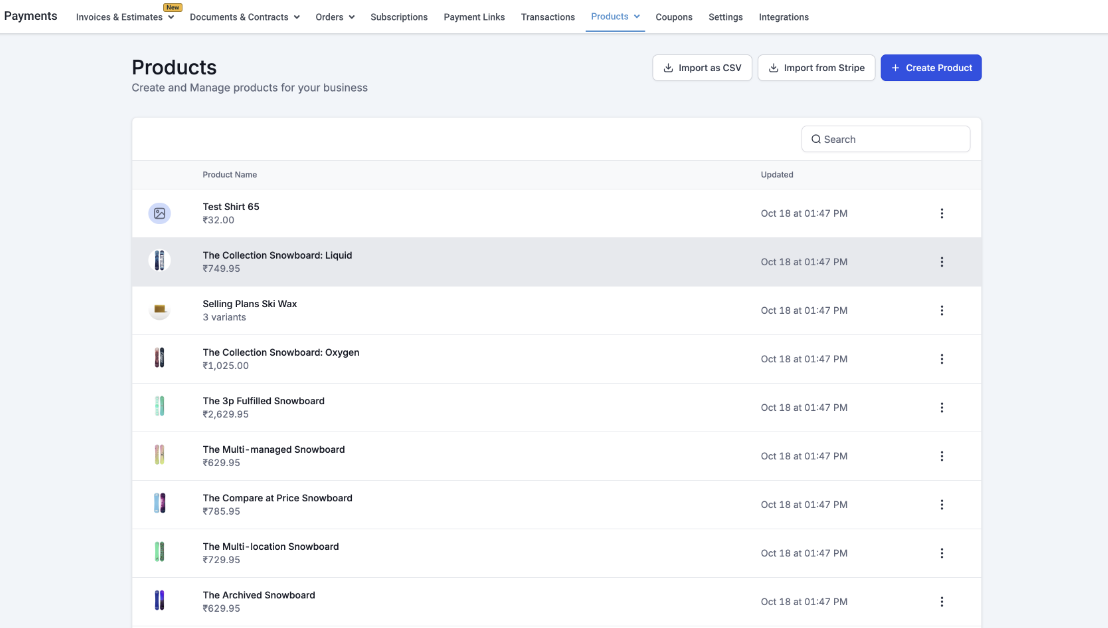
About:
Store owners can now effortlessly import and sync their Products and Collections from Shopify to OS. This enhancement enables store owners to migrate their entire Shopify store, including products, collections, contacts, orders, and transactions, into OS. Additionally, Shopify store owners can leverage OS’s marketing tools, including triggers like Order Submitted Trigger and Payment Received Trigger for better automation.
In the previous version of the Shopify integration, users could sync orders, contacts, and transactions from Shopify to OS The latest update expands this functionality, allowing store owners to seamlessly migrate and sync all their products and collections as well.
How to Use:
• Access the Integration: Shopify integration can be found within a sub-account at: Settings > Integration > Shopify.
• Connect the Shopify Store:
• Click the “connect” button to begin the setup.
• A modal will appear where users must enter the Admin API access Token and a valid Shopify store URL as the first step.
• Select Data to Import:
• In the second step, users will be directed to the Import Elements screen, where they can select which data to import from their Shopify store.
• The available options for import are: Contacts, Orders, Transactions, Products, Collections.
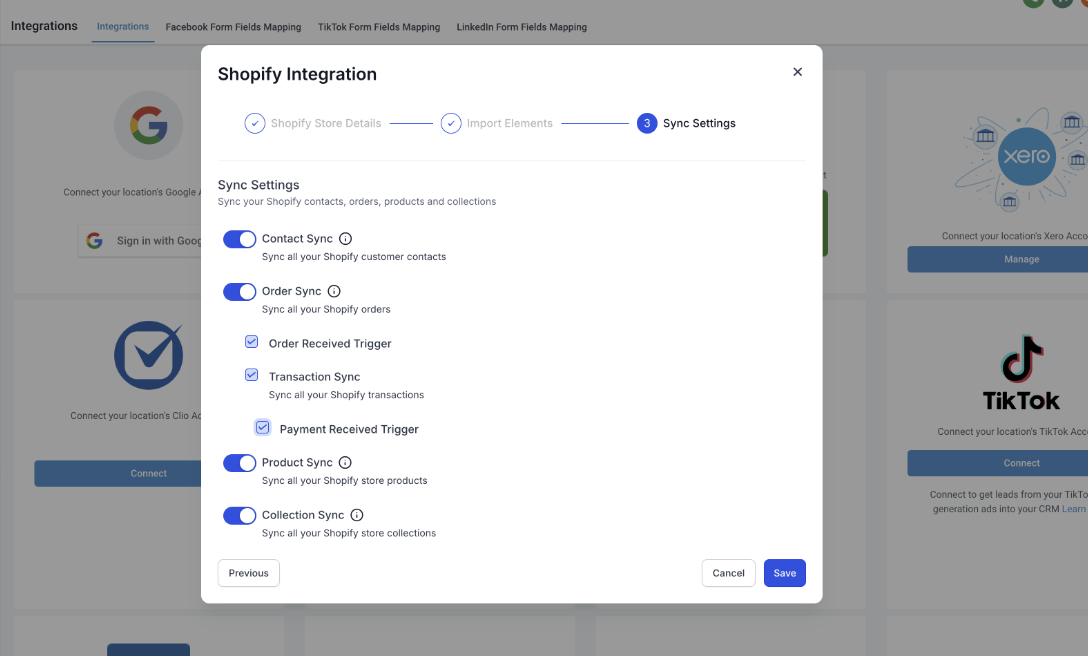
• Configure Syncing Settings:
• The third and final step takes users to the Sync Settings screen, where users can choose which data to continuously sync from Shopify to OS in the future.
• The options for syncing include: Contacts, Orders, Transactions, Order submitted trigger, Payment received trigger, Products, Collections.
• Completing the Setup:
• After selecting the desired elements to import and sync, click Save.
• The import and sync process may take some time to complete.
• Manage Settings:
• Once the Shopify integration is successfully connected, users can enable or disable the elements they want to sync for future orders from the Shopify store.
• Reimporting Data:
• If users wish to reimport data, they can disconnect and reconnect the integration, allowing them to reimport any data they may have missed during the initial import.
Notes:
• Taxes are not mapped in Products while importing or syncing the Products.
• For each order, only one transaction is created in OS.
• Order statuses are marked as “Completed” or “Cancelled” when synced with Shopify.
• Merged contacts in Shopify will have the primary contact updated in OS.
• If there are no changes to the SEO details in Shopify (default SEO settings), the data will be received as null in OS.

November 2nd, 2024
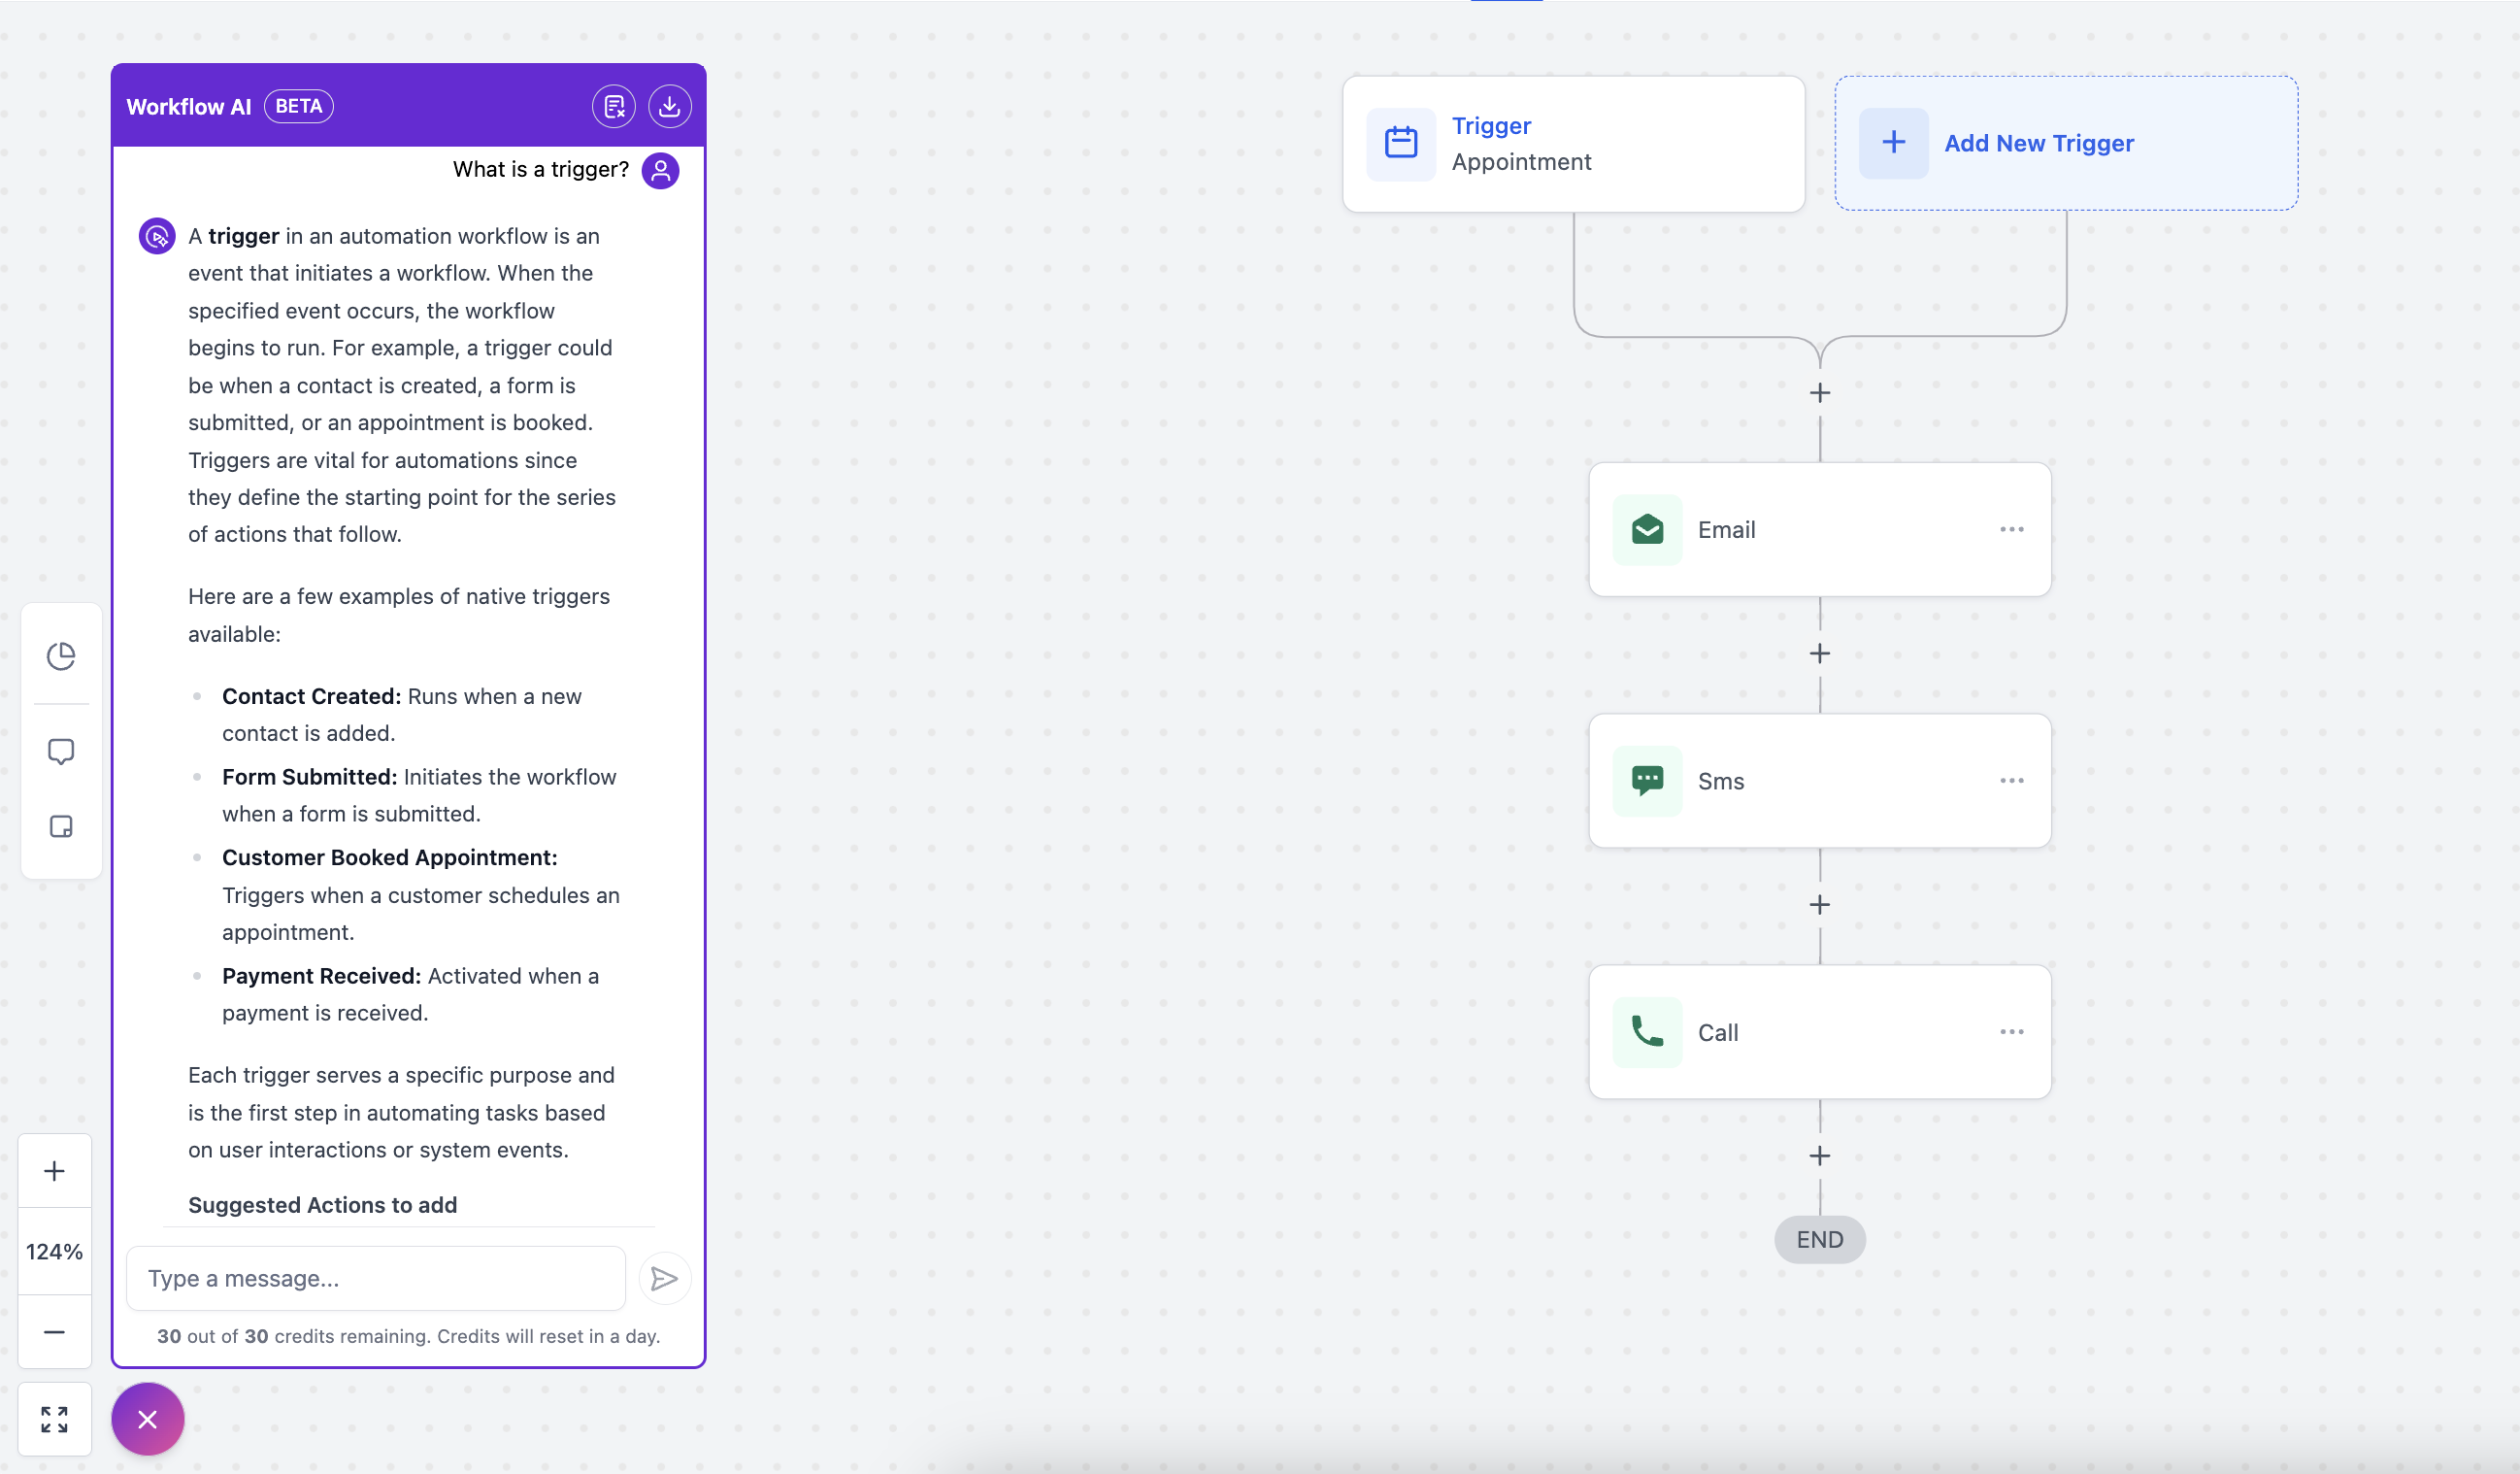
New
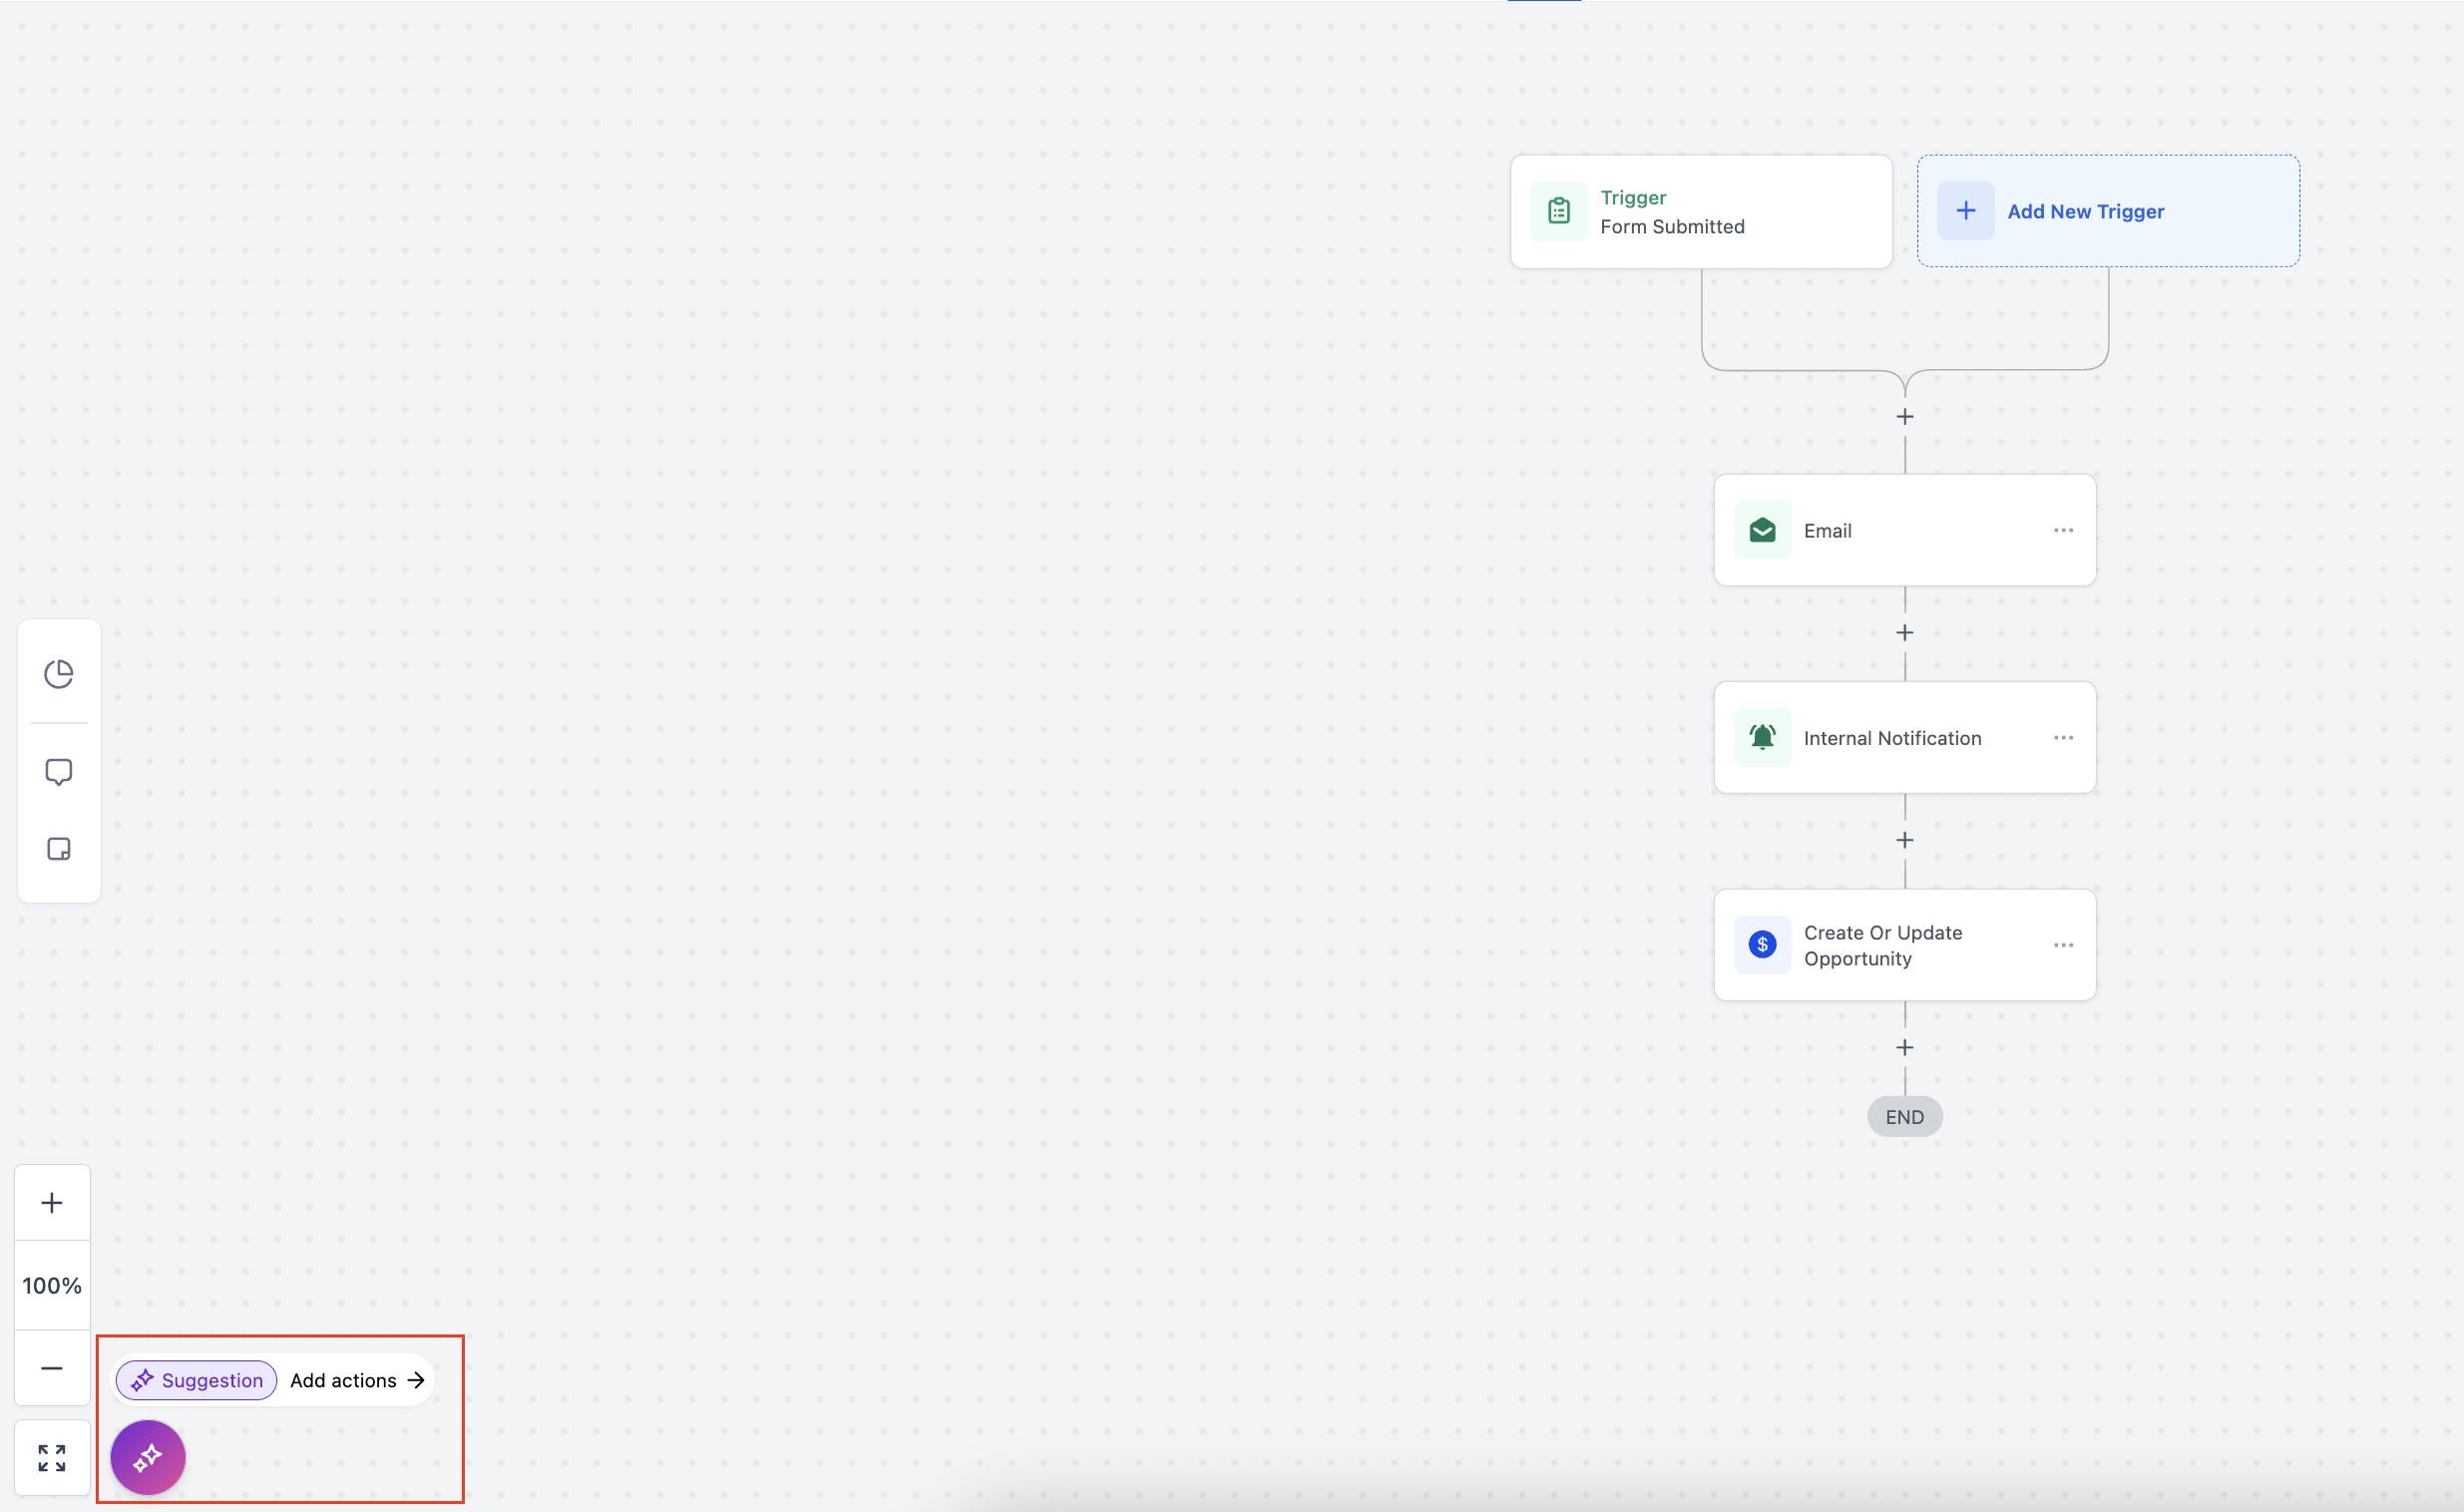
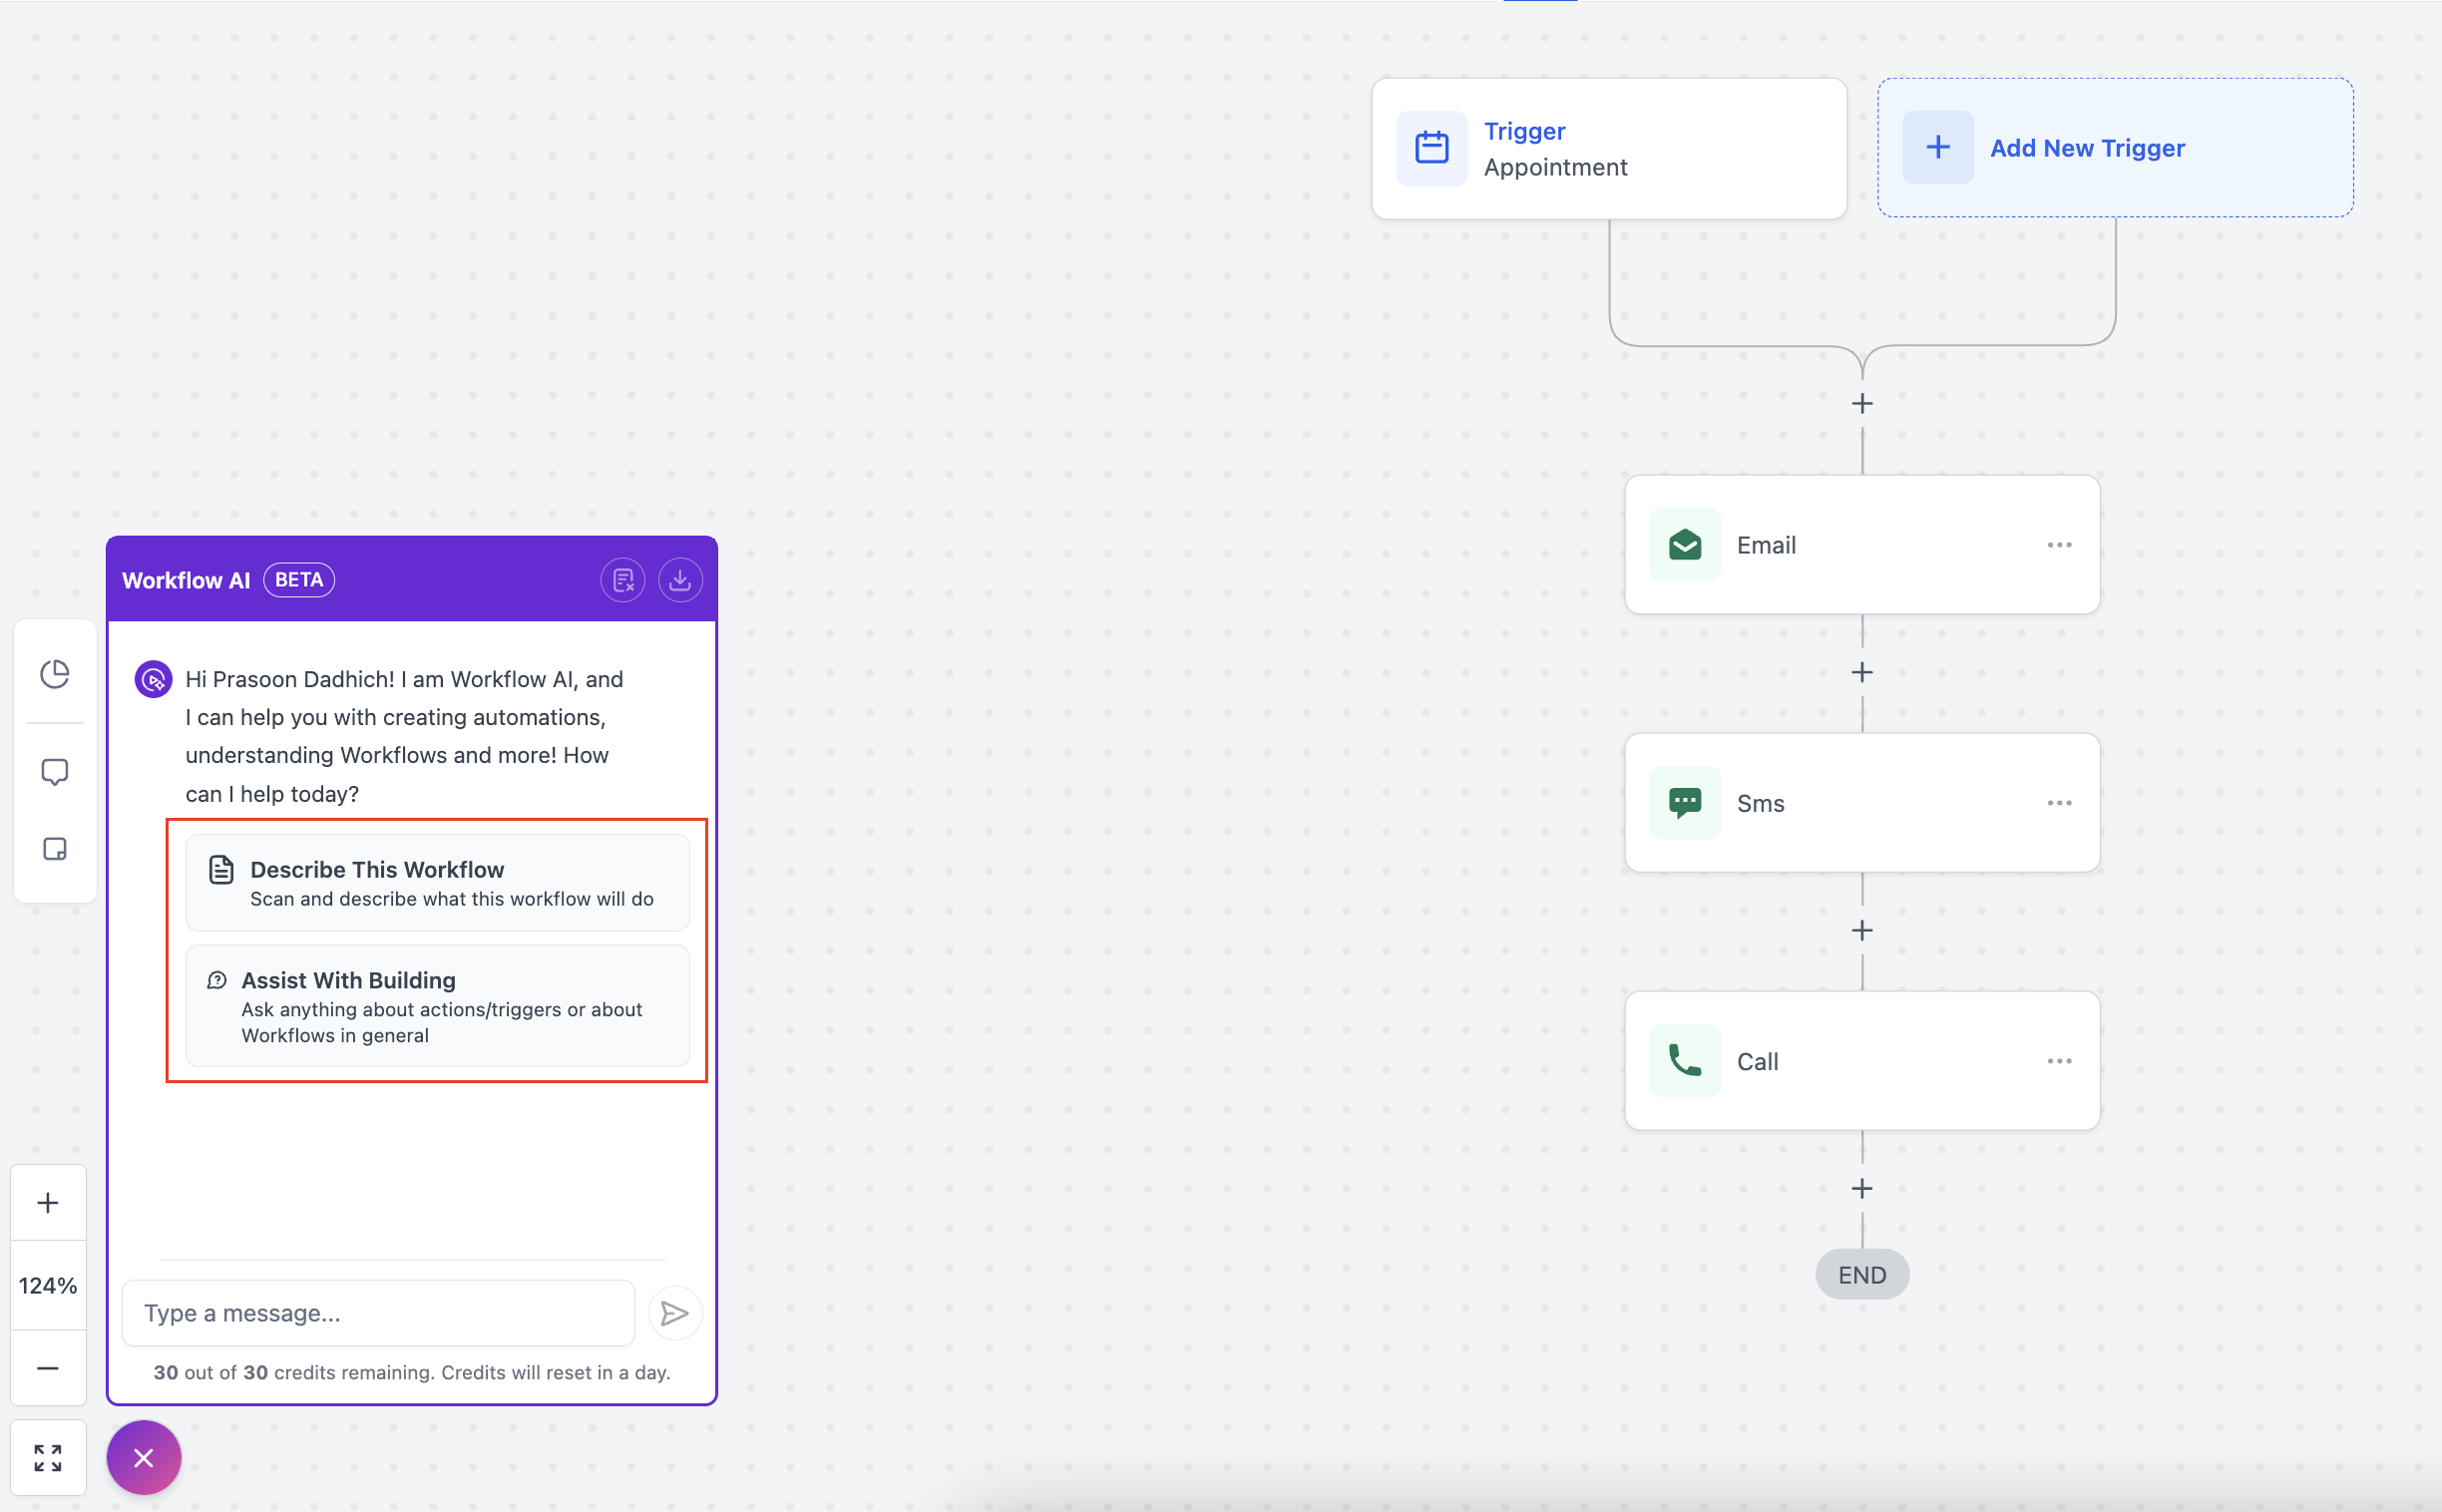
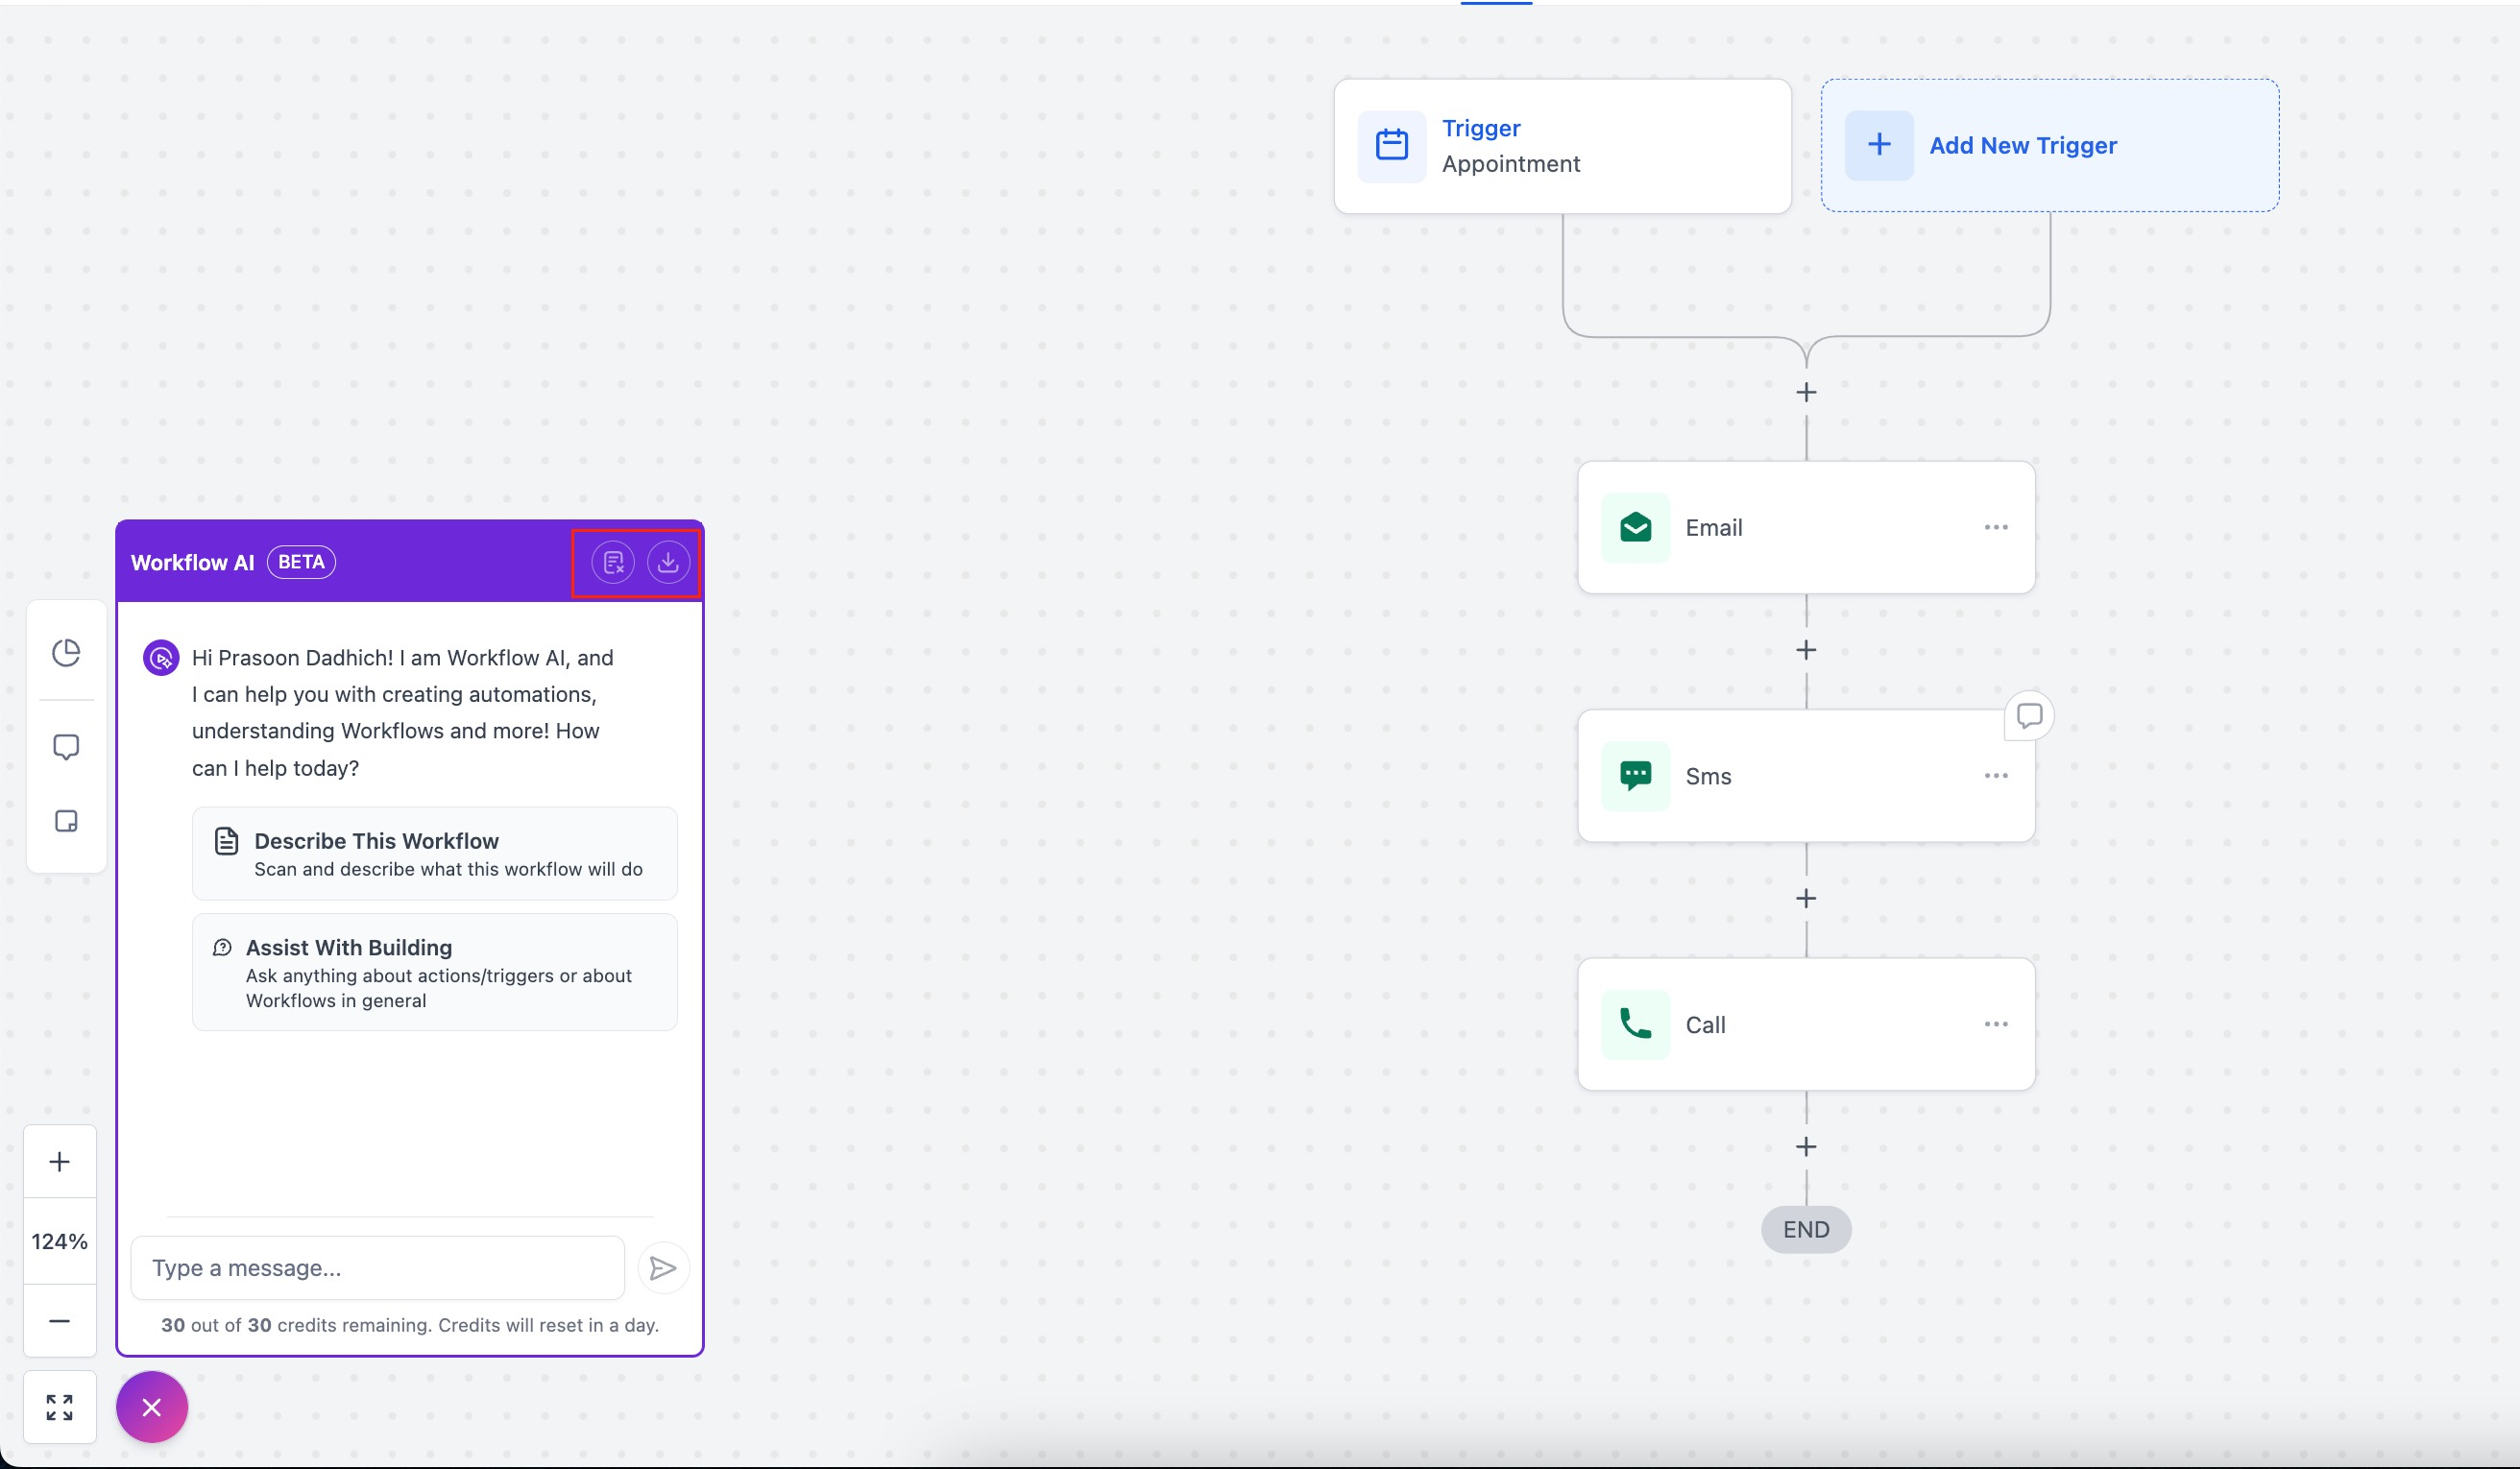
What is Workflow AI?
Workflow AI is an AI powered assistant which will help you building workflows from scratch to finish with ease. It is a helpful guide that’s there to support you as you create, optimize, and manage workflows. Whether you're creating new workflows or refining your workflows, Workflow AI provides step-by-step guidance, suggest the right actions for the job and insights on how to optimize your workflow.
You just have to type what you want to build and Workflow AI will give you the list of actions and triggers to be added to achieve it and how to configure them.
What can Workflow AI do?
Help you with your first workflow: If you are new to workflows, you can just mention what you want to achieve and Workflow AI will give you the actions and triggers you need to add and help you configure the same. AI Assistant can also explain what are workflows and how to use them.
Break Down Your Workflow: If you're not sure about a specific part of your workflow, just ask. Workflow AI can describe what’s happening, making complex workflows easier to understand.
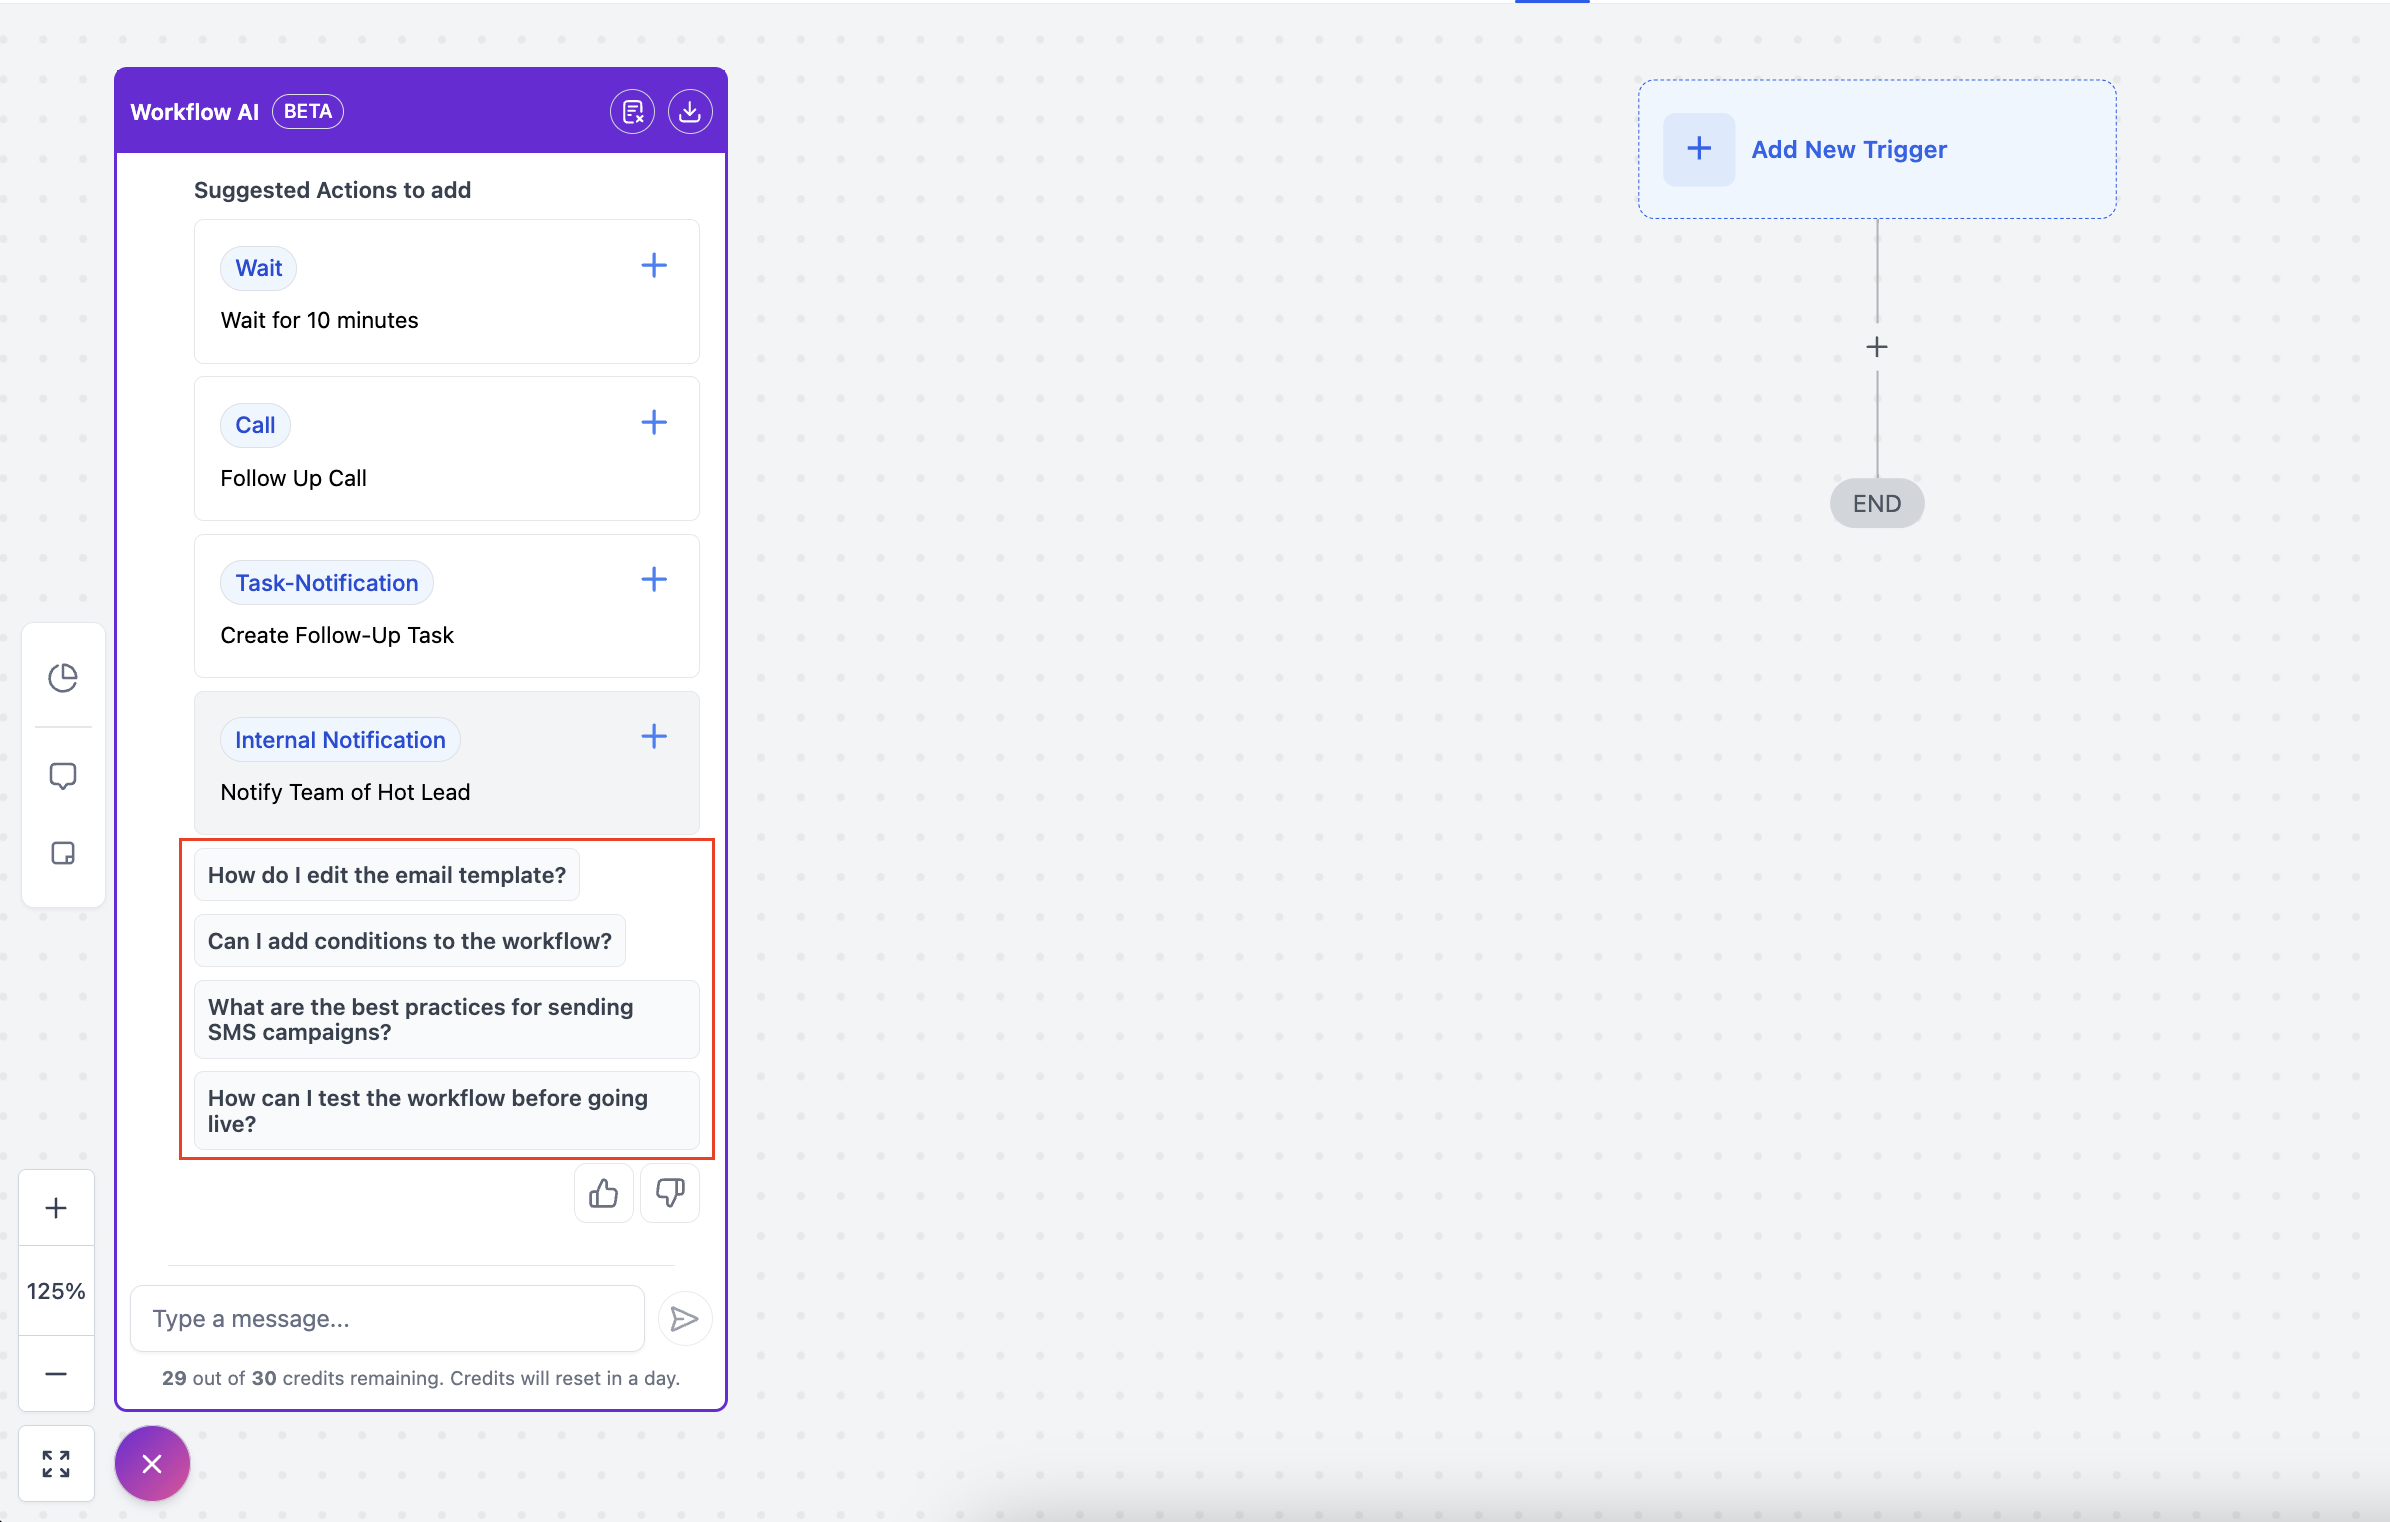
Make Your Workflows More Efficient: Workflow AI can scan your workflow for potential improvements, offering tips on how to streamline processes and what actions can be added to achieve it.
Step-by-Step Guidance: Need help setting up a workflow? Workflow AI can guide you through the process, explaining each step so you can feel confident in what you’re building.
Answer Questions: Got questions while you’re working on a workflow? You can ask Workflow AI for help with any doubts or queries—whether it’s about specific actions or general best practices.
Add Actions to Your Workflow: It can even help you add specific actions—like sending an SMS reminder, waiting for confirmation, updating an appointment status, or tagging contacts based on activity.
Suggest Next Steps: Not sure what to do next? Workflow AI provides suggestions for the next steps you should take, helping you move forward with confidence.
How to get started with Workflow AI?
When you open the builder you can find the Workflow AI on the bottom left corner of the builder.